Halloween 2015

Pikachu6

Better late than never!

Pikachu7

Pikachu2

Pikachu1

For your edification, an excerpt from the Pokémon theme song, the lyrics of which are uncannily applicable to parenthood:

Pokémon, it’s you and me
I know it’s my destiny
Pokémon, oh, you’re my best friend
In a world we must defend

Pokémon, a heart so true
Our courage will pull us through
You teach me and I’ll teach you
Pokémon!

Pikachu3

Pikachu4

Pikachu5


We built a swing set!

swingset4

A certain seven-year-old sister of mine recently outgrew the kiddie swing set in the backyard. This wasn’t just a minor inconvenience but a real calamity, since the swing set was her therapy. Whenever she was emotionally overwrought my mom would send her to the backyard; she’d sing her lungs out and swing for a couple hours and then come back inside a new creature.

swingset5

Swinging wasn’t just her therapy; in her words, “Swinging is my best talent. I’m going to be a swinger when I grow up.” So there you have it. Her healing balm, her talent, and her calling and vocation.

Mark and I had drawn her name for Christmas, and I really wanted to get her a swing set big enough for her. But real backyard swing sets are ridiculously expensive. So I decided that we were going to build one.

Mark warned me that it would be a long, involved project. “No, it won’t take that long!” I told him.

He was right. It was a doozy. I guess I underestimate how long and intense things will be—like the high Uintas backpacking trip we did with 4+ feet of snow on the ground last summer, or the 500-mile camping road trip on the bullet bike the summer before. Or buying and remodeling a decrepit 60-year-old house on a shoestring student budget.

But the best feeling in the world is biting off more than you can chew and chewing it anyway, right? It was an involved project. But the wonderful man I’m married to stuck with me and didn’t complain or remind me, “I told you so.” We finished the swing set on Christmas Eve, just in time for a little sister’s Christmas present (and just before a three-day blizzard hit).

And the effort was all worth it every time we see this happy swinging face!

swingset2

swingset3

swingset1

Nature’s first green is gold…

canvas5

For a long time I’ve wanted to mount a hinged canvas on the wall in our hallway to cover the eyesore that is our crooked electrical panel.

Yes, it really is that crooked!

Yes, it really is that crooked!

But a a 16×20 canvas photo print wasn’t in our budget, so this week I painted and hung a canvas of my own. The whole project cost less than $15 and took about an hour. Here’s the rundown, in case you want to try it yourself.

Materials:
16×20 canvas from Walmart, $7.97 for two
Green and gold acrylic craft paint (I already had white) from Walmart, 50¢ each
Gold leaf spray paint from Walmart, $2.77
Narrow utility hinges from Home Depot, $1.97 for a package of two (screws included)
Leaves and branches from the yard
Scotch tape
Total cost: $13.71

Painting the canvas

canvas2

Paint the canvas, layering and mixing the colors for a marbled effect. Don’t worry about being too precise. The dappled, variegated look is the whole point. I chose green and gold, but any colors would  be pretty. Maybe I’ll try red and purple next?

Spray-painting the leaf design

canvas3

Gather some leaves and branches. Be sure to choose ones that lay flat well. Affixing the leaves to the canvas is a must. Adhesive spray would probably be ideal, but I used Scotch tape because it’s what I had on hand. It left little tape marks where the spray paint didn’t reach, but they don’t bother me. All part of the charm. Once you’ve thoroughly spray-painted over the leaves, you can remove them. I used a paint brush to touch up the stems.

Hanging the canvas

canvas4

Screw the hinges first into the wood frame of the canvas, and then into the drywall.

And that’s it! No more ugly electrical panel!

canvas

The DIY gift that all the 8- to 28-year-old boys in your life will love.

swordpost

I have five younger brothers. Anyone who has a lot of brothers (or a lot of cousins, or a lot of sons) knows that they sometimes enjoy beating each other up. In a good way.

Mark and my brothers like to stage sword fights together, but there’s a problem with the weaponry. We’ve bought several wooden practice swords over the years, but they’re small flimsy things that snap and break too easily. On the other hand, real swords are too heavy, too sharp, and in all aspects too dangerous to really use in sword fights.

So for my brother’s birthday Mark set out to design and create the ideal play swords: something sturdy enough not to get broken in combat play but still soft enough not to do any real damage in a heavy blow.

The swords that Mark engineered fit the bill perfectly. Because of the PVC core, they are sturdy and unbreakable and feel heavy like real swords. But because of the soft foam all around the “blades,” you can deliver really hard hits without hurting anyone. Perfect for a band of backyard scalawags.

To make a batch of swords for your crew, all you’ll are the following materials:

  • A permanent marker.
  • Scissors.
  • Duct tape. With two full rolls of duct tape you can make four swords; you may want a few different colors (we used black, standard silver/gray, and red).
  • A camping pad. Nothing fancy, just a cheap foam one–you can buy them at Walmart or just about anywhere for under $15. One camping pad is enough to make five swords.
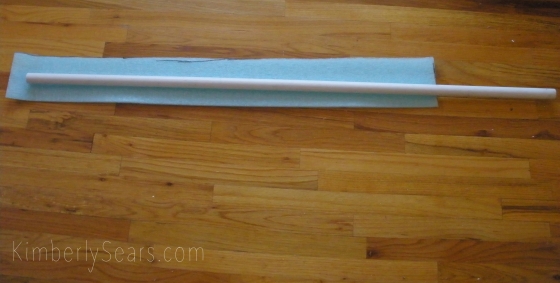
  • PVC pipe, cut to the lengths you want the swords to be. We used quarter-inch PVC and cut the swords to lengths between three and five feet long.

OLYMPUS DIGITAL CAMERA

The first step (below) is to roll your PVC into the camping pad and mark where the edge touches. This mark lets you know how wide to cut your piece of foam. Also mark where you want the blade of your sword to end and the hilt to begin (below, bottom). This mark lets you know how long to cut your piece of foam, since the hilt of the sword will not have foam wrapped around it.

beginningsteps1

Next cut out your piece of foam from the camping pad, following the marks you just made. Be sure to do this in your pajamas and then post a photo on the internet.

OLYMPUS DIGITAL CAMERA

Now you have your foam piece cut perfectly to fit the size of the PVC pipe. (Except the hilt; it remains uncovered because if it were wrapped in foam it would be too thick to grip.)

OLYMPUS DIGITAL CAMERA

Now you get to start making the blade of your sword! Roll the foam around the PVC and secure it with a few pieces of duct tape. Make sure to roll, wrap, and tape really tightly because otherwise the foam will slide around on your PVC. And a sliding-around-foam-sword would not be a very intimidating way to do battle.

OLYMPUS DIGITAL CAMERA

Keep wrapping tape as tightly as you can (below) until the blade is all covered (below, bottom).

tapewrap

Getting a pointy sword tip is easy–you just cut the ends of your foam and wrap more duct tape.

OLYMPUS DIGITAL CAMERA

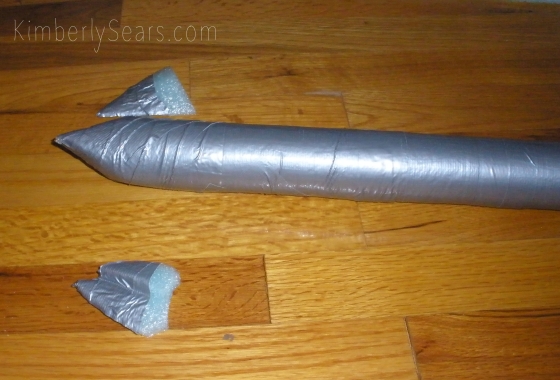
Now you’ll have a fine-looking blade! But alas, no hilt. This is where a second color of duct tape plays a part. You wrap it around the bare PVC to make a hilt. We used black (below).

hilt

And now the fun part! (Not that ripping piece after piece of silver duct tape for the blade ISN’T fun.) Time to add finishing touches!

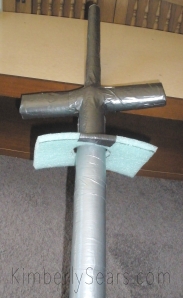
You can use colored duct tape to add a pommel (above). You can use more foam and duct tape to engineer a cross guard, or even two (below). Let your imagination run wild. Watch Lord of the Rings to inspire you (and to keep you entertained while you rip duct tape for two hours.)

OLYMPUS DIGITAL CAMERA

Behold the finished products!

OLYMPUS DIGITAL CAMERA finishedswords2

Below, a hand and a half sword

sword4

A Scottish broadsword

sword3

A Norman sword

sword2

A Scottish claymore, or two-handed longsword

sword1

I worried that there might be some arguing about who claimed which sword, but that was not the case. Each warrior gravitated to a different sword (thank goodness!). No arguments.

fourswords

The battles, however, are just beginning!

photo 2-7

photo 3-3

Avast ye! There are games afoot!

And now I’m off on a summer road trip to go enjoy Fourth of July fireworks agains the backdrop of the Tetons! Happy Independence Day!

P.S. I’ve decided that for the rest of the summer I’ll be posting once a week, on Thursdays. (Why Thursday? Because I was born on a Thursday, and married on a Thursday…it’s my favorite day of the week!)