We built a swing set!

swingset4

A certain seven-year-old sister of mine recently outgrew the kiddie swing set in the backyard. This wasn’t just a minor inconvenience but a real calamity, since the swing set was her therapy. Whenever she was emotionally overwrought my mom would send her to the backyard; she’d sing her lungs out and swing for a couple hours and then come back inside a new creature.

swingset5

Swinging wasn’t just her therapy; in her words, “Swinging is my best talent. I’m going to be a swinger when I grow up.” So there you have it. Her healing balm, her talent, and her calling and vocation.

Mark and I had drawn her name for Christmas, and I really wanted to get her a swing set big enough for her. But real backyard swing sets are ridiculously expensive. So I decided that we were going to build one.

Mark warned me that it would be a long, involved project. “No, it won’t take that long!” I told him.

He was right. It was a doozy. I guess I underestimate how long and intense things will be—like the high Uintas backpacking trip we did with 4+ feet of snow on the ground last summer, or the 500-mile camping road trip on the bullet bike the summer before. Or buying and remodeling a decrepit 60-year-old house on a shoestring student budget.

But the best feeling in the world is biting off more than you can chew and chewing it anyway, right? It was an involved project. But the wonderful man I’m married to stuck with me and didn’t complain or remind me, “I told you so.” We finished the swing set on Christmas Eve, just in time for a little sister’s Christmas present (and just before a three-day blizzard hit).

And the effort was all worth it every time we see this happy swinging face!

swingset2

swingset3

swingset1

Nature’s first green is gold…

canvas5

For a long time I’ve wanted to mount a hinged canvas on the wall in our hallway to cover the eyesore that is our crooked electrical panel.

Yes, it really is that crooked!

Yes, it really is that crooked!

But a a 16×20 canvas photo print wasn’t in our budget, so this week I painted and hung a canvas of my own. The whole project cost less than $15 and took about an hour. Here’s the rundown, in case you want to try it yourself.

Materials:
16×20 canvas from Walmart, $7.97 for two
Green and gold acrylic craft paint (I already had white) from Walmart, 50¢ each
Gold leaf spray paint from Walmart, $2.77
Narrow utility hinges from Home Depot, $1.97 for a package of two (screws included)
Leaves and branches from the yard
Scotch tape
Total cost: $13.71

Painting the canvas

canvas2

Paint the canvas, layering and mixing the colors for a marbled effect. Don’t worry about being too precise. The dappled, variegated look is the whole point. I chose green and gold, but any colors would  be pretty. Maybe I’ll try red and purple next?

Spray-painting the leaf design

canvas3

Gather some leaves and branches. Be sure to choose ones that lay flat well. Affixing the leaves to the canvas is a must. Adhesive spray would probably be ideal, but I used Scotch tape because it’s what I had on hand. It left little tape marks where the spray paint didn’t reach, but they don’t bother me. All part of the charm. Once you’ve thoroughly spray-painted over the leaves, you can remove them. I used a paint brush to touch up the stems.

Hanging the canvas

canvas4

Screw the hinges first into the wood frame of the canvas, and then into the drywall.

And that’s it! No more ugly electrical panel!

canvas

My weapon of choice for removing bushes and fighting zombies

bushremoval1

…Is a Sawzall!

When we first moved into our house, the front yard landscape was dominated by a mammoth evergreen shrub. It may have been an attractive bush once, when it was first planted; but it had grown way out of control. Its diameter was a whopping fourteen feet!

In the Google street photos below, taken a couple years before we moved in, you can see just how enormous this thing really was. It had basically commandeered the entire front yard!

2013-10-10 10.09.50

2013-10-10 10.17.59

bushremoval2

We nicknamed it Ba Sing Se. Because it was green, earthy, and vast enough to hide a flying bison inside.

Something had to be done. We were going to remove the bush completely, but I had a crazy idea: why not carve it into something that looked more like a tree? That way it could still offer some privacy for our big front room window without monopolizing the entire front yard.

So my dad taught me how to use the Sawzall, and afternoon after afternoon I carved away at that thing.

2013-11-09 05.48.48

As I hacked away, I found old bottles, all kinds of trash, a can of spray paint, and no small number of black widow spiders. Hauling away all the debris was no small feat, either. The bush was so dense that it produced a pile of branches the size of a large pickup truck and six big black construction bags full of needles (seriously!).

We planted two maple trees flanking the bush on either side, and I kept sawing away as the bush got smaller…

bushremoval3

And smaller…

bushremoval4

And smaller…

bushremoval5

And smaller. A few years down the road when the maple trees have grown and filled in enough to give some privacy for the front of the house, we may remove the bush completely. But for now we’re quite happy with our “American bonsai tree.”

bushremoval6

And seriously, zombies, don’t mess with me. I know how to wield a Sawzall, okay? My revenge will be swift and terrible.

The DIY gift that all the 8- to 28-year-old boys in your life will love.

swordpost

I have five younger brothers. Anyone who has a lot of brothers (or a lot of cousins, or a lot of sons) knows that they sometimes enjoy beating each other up. In a good way.

Mark and my brothers like to stage sword fights together, but there’s a problem with the weaponry. We’ve bought several wooden practice swords over the years, but they’re small flimsy things that snap and break too easily. On the other hand, real swords are too heavy, too sharp, and in all aspects too dangerous to really use in sword fights.

So for my brother’s birthday Mark set out to design and create the ideal play swords: something sturdy enough not to get broken in combat play but still soft enough not to do any real damage in a heavy blow.

The swords that Mark engineered fit the bill perfectly. Because of the PVC core, they are sturdy and unbreakable and feel heavy like real swords. But because of the soft foam all around the “blades,” you can deliver really hard hits without hurting anyone. Perfect for a band of backyard scalawags.

To make a batch of swords for your crew, all you’ll are the following materials:

  • A permanent marker.
  • Scissors.
  • Duct tape. With two full rolls of duct tape you can make four swords; you may want a few different colors (we used black, standard silver/gray, and red).
  • A camping pad. Nothing fancy, just a cheap foam one–you can buy them at Walmart or just about anywhere for under $15. One camping pad is enough to make five swords.
  • PVC pipe, cut to the lengths you want the swords to be. We used quarter-inch PVC and cut the swords to lengths between three and five feet long.

OLYMPUS DIGITAL CAMERA

The first step (below) is to roll your PVC into the camping pad and mark where the edge touches. This mark lets you know how wide to cut your piece of foam. Also mark where you want the blade of your sword to end and the hilt to begin (below, bottom). This mark lets you know how long to cut your piece of foam, since the hilt of the sword will not have foam wrapped around it.

beginningsteps1

Next cut out your piece of foam from the camping pad, following the marks you just made. Be sure to do this in your pajamas and then post a photo on the internet.

OLYMPUS DIGITAL CAMERA

Now you have your foam piece cut perfectly to fit the size of the PVC pipe. (Except the hilt; it remains uncovered because if it were wrapped in foam it would be too thick to grip.)

OLYMPUS DIGITAL CAMERA

Now you get to start making the blade of your sword! Roll the foam around the PVC and secure it with a few pieces of duct tape. Make sure to roll, wrap, and tape really tightly because otherwise the foam will slide around on your PVC. And a sliding-around-foam-sword would not be a very intimidating way to do battle.

OLYMPUS DIGITAL CAMERA

Keep wrapping tape as tightly as you can (below) until the blade is all covered (below, bottom).

tapewrap

Getting a pointy sword tip is easy–you just cut the ends of your foam and wrap more duct tape.

OLYMPUS DIGITAL CAMERA

Now you’ll have a fine-looking blade! But alas, no hilt. This is where a second color of duct tape plays a part. You wrap it around the bare PVC to make a hilt. We used black (below).

hilt

And now the fun part! (Not that ripping piece after piece of silver duct tape for the blade ISN’T fun.) Time to add finishing touches!

You can use colored duct tape to add a pommel (above). You can use more foam and duct tape to engineer a cross guard, or even two (below). Let your imagination run wild. Watch Lord of the Rings to inspire you (and to keep you entertained while you rip duct tape for two hours.)

OLYMPUS DIGITAL CAMERA

Behold the finished products!

OLYMPUS DIGITAL CAMERA finishedswords2

Below, a hand and a half sword

sword4

A Scottish broadsword

sword3

A Norman sword

sword2

A Scottish claymore, or two-handed longsword

sword1

I worried that there might be some arguing about who claimed which sword, but that was not the case. Each warrior gravitated to a different sword (thank goodness!). No arguments.

fourswords

The battles, however, are just beginning!

photo 2-7

photo 3-3

Avast ye! There are games afoot!

And now I’m off on a summer road trip to go enjoy Fourth of July fireworks agains the backdrop of the Tetons! Happy Independence Day!

P.S. I’ve decided that for the rest of the summer I’ll be posting once a week, on Thursdays. (Why Thursday? Because I was born on a Thursday, and married on a Thursday…it’s my favorite day of the week!)

Typewriter Table Transformed

For all of our growing-up years, my younger sister and I shared a bedroom. We painted two of the walls apple green and two of them buttery yellow. We slept on sturdy old metal army bunk beds, which we spray-painted sunshiny yellow and alternately bunked or un-bunked throughout the years as we rearranged furniture to try to squeeze more real estate out of our tiny room.

Thrift store scavenging and one-of-a-kind flea market finds were family obsessions, so when I was in high school and I found an old metal typewriter table at a yard sale for less than $20, I was stoked. I spray-painted it pink, and together with a print of my favorite Claude Monet painting, it perfectly accented our little green-and-yellow room.

OLYMPUS DIGITAL CAMERA

When Mark and I moved into our house, I dug the beloved typewriter table out of my parents’ garage and brought it with me. But the pink color didn’t work with the orange and blue color scheme that carries through our kitchen, dining room, and family room, so I knew that I needed to re-paint it. I decided on a deep, dark, jewel-toned blue.

When I carried the table out to the backyard to spray-paint it, I was hit with a wave of nostalgia for years and years sharing clothes and pedicures and silly dance parties with my sister in our little green and yellow room. I almost couldn’t bring myself to paint over the pink.

But it had to be done, so I sanded the table, wiped it down thoroughly, covered the casters with painter’s tape, and set it on a plastic drop cloth on the grass.

typewritersteps1b

After applying one thin coat of paint, the table looked…like an Easter egg. By the second coat it looked more navy blue, solid, and industrial. The way a typewriter table should look. Not like an Easter egg. You know?

bluespraypaint_Fotor

Why is my shoe in the picture, you ask? Because when you’re spray-painting furniture in your backyard and the wind kicks up, you don’t stop painting to grab some rocks. You just kick off your shoe and use it to hold down your plastic drop cloth. Obviously.

All finished, the jewel-toned blue of the table complemented perfectly the bold orange accessories in the room.

finishedblue_Fotor

I even got around to cutting foam board, ordering glass, and hanging up the vintage 1936 “Visit Palestine” poster I bought in Jerusalem six years ago.

OLYMPUS DIGITAL CAMERA

And the best part is that on evenings when Mark and I are both writing, we can drag the typewriter table anywhere in the house, perch a laptop on it, and…type on it. That’s what it’s for, after all.

I love seventies fixtures.

Seventies style sometimes gets a bad rap. Avocado-colored refrigerators and dark brown thick-piled carpet aren’t everyone’s cup of tea, and city recycling programs have pretty much made trash-compactors obsolete. But can I tell you a secret? I love seventies style. Our house was built in the 1950s but later received a snapping seventies renovation. I love love LOVE my orange kitchen cabinets. I love that we have an old intercom system that no longer functions, so that when we push the buttons it emits a screeching noise that Mark calls our “pet baby velociraptor” and introduces to any kids who come to visit. I love it all.

And I really, really love our light fixtures! Old school fixtures just have so much personality.

This one hangs in our bedroom over the foot of our bed.

Mark has lovingly christened this the "Deseret disco ball" for its honeycomb-like design. I love it for its West Elm kind of bold yet understated style.

Mark has lovingly christened this the “Deseret disco ball” for its honeycomb-like design. I love it for its West Elm kind of bold yet understated style.

These hang over the mirror in the master bathroom.

I love the way the heaviness of these contrasts with the light airy aqua color I painted our bathroom. And I love having a lot of light right by the bathroom mirror!

The rubbed brass and heavy chain contrast perfectly with the airy aqua color I painted the bathroom. And I love having bright lights right by the bathroom mirror!

The orange chandelier is my favorite because it's just wicked cool.

The orange chandelier is my favorite because it’s just wicked cool. Once someone asked me what we planned to do about our orange chandelier and cabinets, and I just laughed because I LOVE THEM so much. They are what I would choose if I were building my dream home tomorrow.

OLYMPUS DIGITAL CAMERA

Like every other aspect of our house, these fixtures were an enormous amount of work because of how filthy they were. There was a yellow-brown film of tobacco smoke stain over every surface imaginable. Cleaning each fixture took several hours (and I could probably clean them better still).

To give you an idea, see the white candlestick parts of the orange chandelier? Yeah, before I cleaned them we thought they were orange, too.  The orange parts themselves? They were the color of rotting fall leaves, and when I scrubbed off the grime I was tickled by the bright orange revealed underneath.

The big round fixture in the bedroom was one of the worst, since the previous owner of our home smoked so much in her bedroom (she smoked so much in every room of the house, but the bedroom was one of the worst). We actually thought the fixture had brown stained glass; then one day when my mom came over she took the fixture down, scrubbed the whole thing with hot soapy water in the sink, and POOF! It was actually translucent white glass under the nastiness all that time.

I’m so glad that under all the filth there were bold bright designs with enduring style and staying power. These guys are stayin’ alive.

Scarf Shelf

When I was a kid sometimes I felt like inanimate objects had personalities and feelings. I guess I just read and watched A Little Princess too much, because if I realized that I’d been neglecting one of my dolls or stuffed animals I’d feel guilty and do my best to make it up to him or her. I thought I was the only one who had this quirk until Mark confessed the same thing. To this day, if he has several pens in his school backpack, he feels a compulsion to use them all equally  “so that no one feels left out.” He blames this silly sentiment on Toy Story.

I really really really love wearing scarves, and it’s always a bummer to find a scarf that was shoved to the back of a drawer and forgotten for several months. It’s like missing out on the company of a good friend (okay, just kidding). I determined that I wanted my scarves stored on the wall on a shelf where I could see and love and wear them all.

For a time, while I hunted down a shelf, my scarves were all in a pile on the floor.

photo 2

But then I got a cheap shelf from Target.

photo 1

And now my scarves look like this!

OLYMPUS DIGITAL CAMERA OLYMPUS DIGITAL CAMERA

Alhambra-Inspired Stenciled Bathroom Floor

Our house is a little red brick post-war home built in the 1950s, but in 1980 it got an addition and a very 70s/80s makeover, complete with a trash compactor, an intercom system throughout the house (very necessary for a 1385 square foot home, right?), and shaggy dark brown carpet in every room. Including the master bathroom.

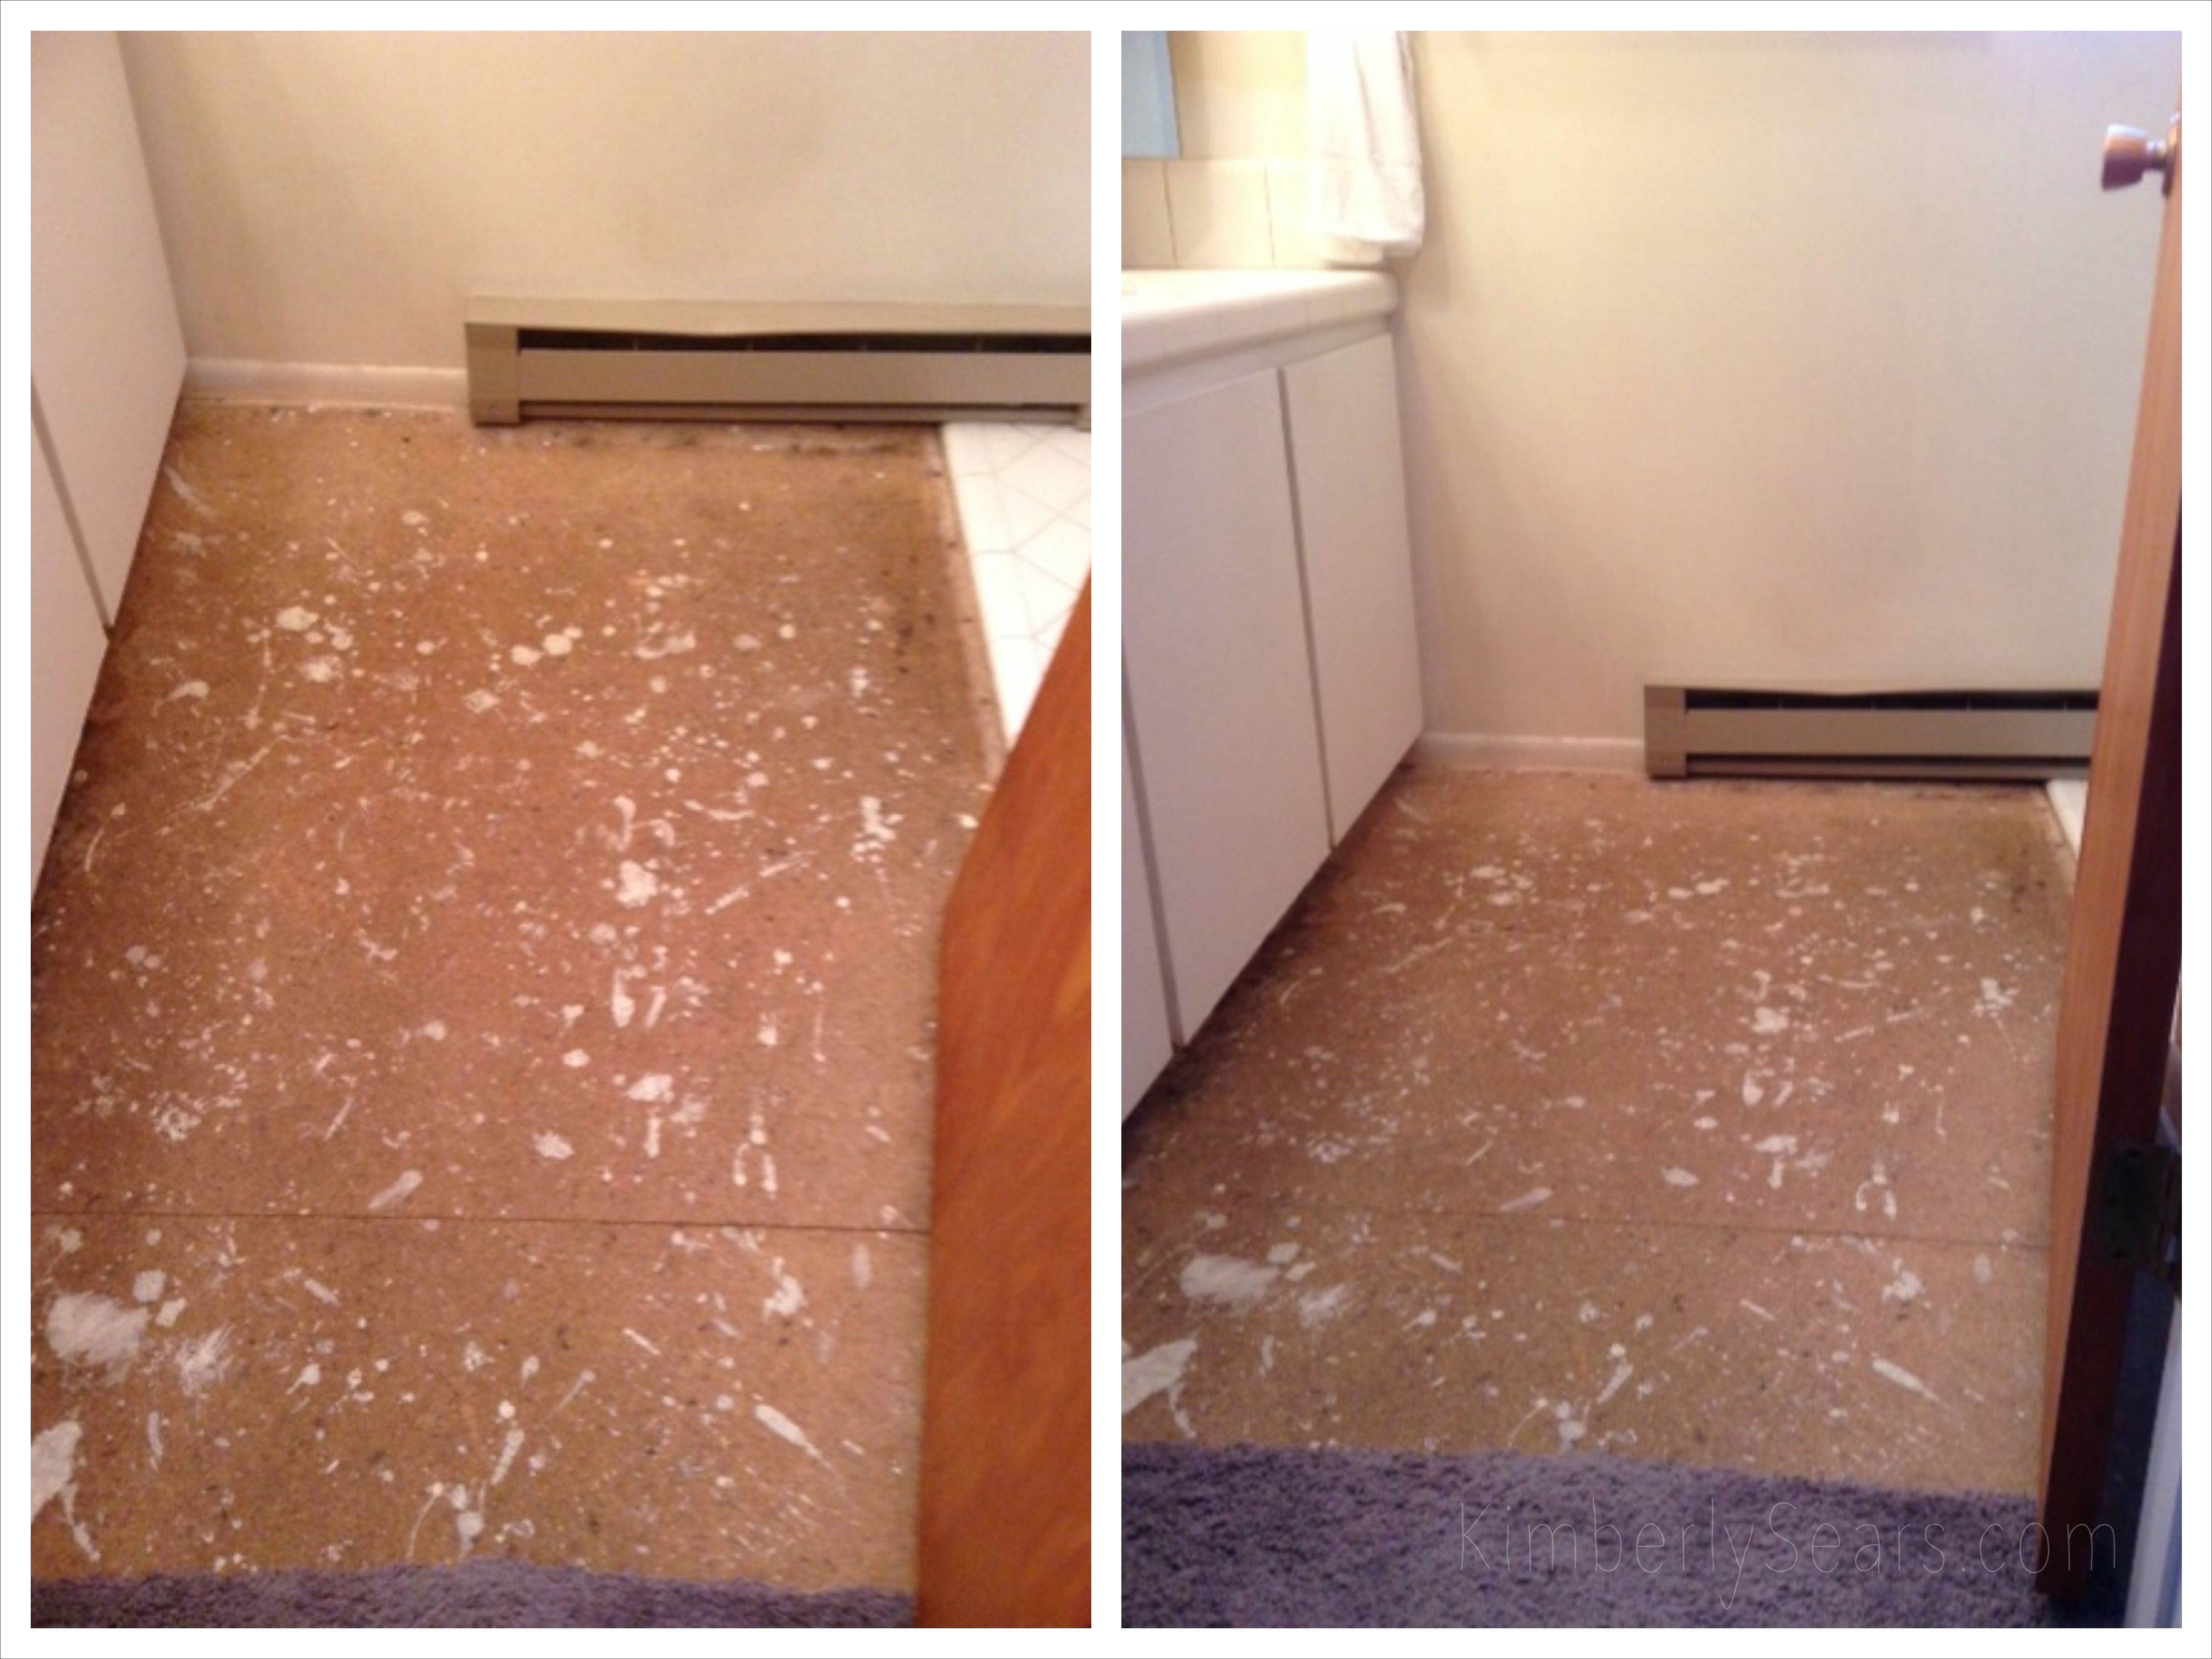
As soon as we got the key to our new house, the first thing to go was that dark brown carpet. We were left with a paint-splattered particle board floor in half of our bathroom. There were mold spots in parts of it, and it was pitted with nail holes from where the tack strip had been. But anything was better than that nasty brown carpet.

before

We didn’t have money to re-tile, so for a long time I entertained the notion of coating the whole floor with Kilz primer and then painting it with a pretty faux-tile design. I love, love love paint and the way it makes everything shiny and new. But would it the floor be waterproof and hold up okay if we just painted it? Was that just an amateur solution? I wasn’t sure.

Meanwhile I tried to talk myself into liking some inexpensive Home Depot peel and stick tiles (below) but I just wasn’t feeling the love.

peelandstick

And then I read this post and was surprised to read how well their painted and stenciled floor was holding up. I decided that if professional house bloggers could paint and stencil their subfloor, then so could I.

I didn’t want to step out of the shower onto ugly board even one more day, so one morning while Mark was at work I started the project. (I hope to surprise him with a finished floor that evening—ha! Never underestimate the power of any given house project to take three to five times as long as you think it should. You’d think I would have learned that by now.)

woodputty1

The first order of business was to sand the entire floor with a rough-grit sandpaper to smooth it out as much as possible. But there were still nail holes and random pits, and the huge unsightly crack where the particle boards met. So I spent an hour or two filling in everything with wood putty (in hindsight, I would have just spent $2 more for a bigger tube of wood putty–it’s only $2 and squeezing the putty out of the tiny tube got kind of torturous by the end). Once the putty had dried I sanded the entire floor again, this time with a finer-grit sandpaper. I did my best to set aside my perfectionist tendencies, knowing that this rough particle-board floor could never be completely smooth, but knowing that the paint and stencil would hide a lot of little imperfections.

primer1

After a thorough wipe-down, I gave the floor a coat of Kilz 2 Primer, Sealer, & Stainblocker. I love this stuff; we’ve used buckets and buckets of it in every room of our house.

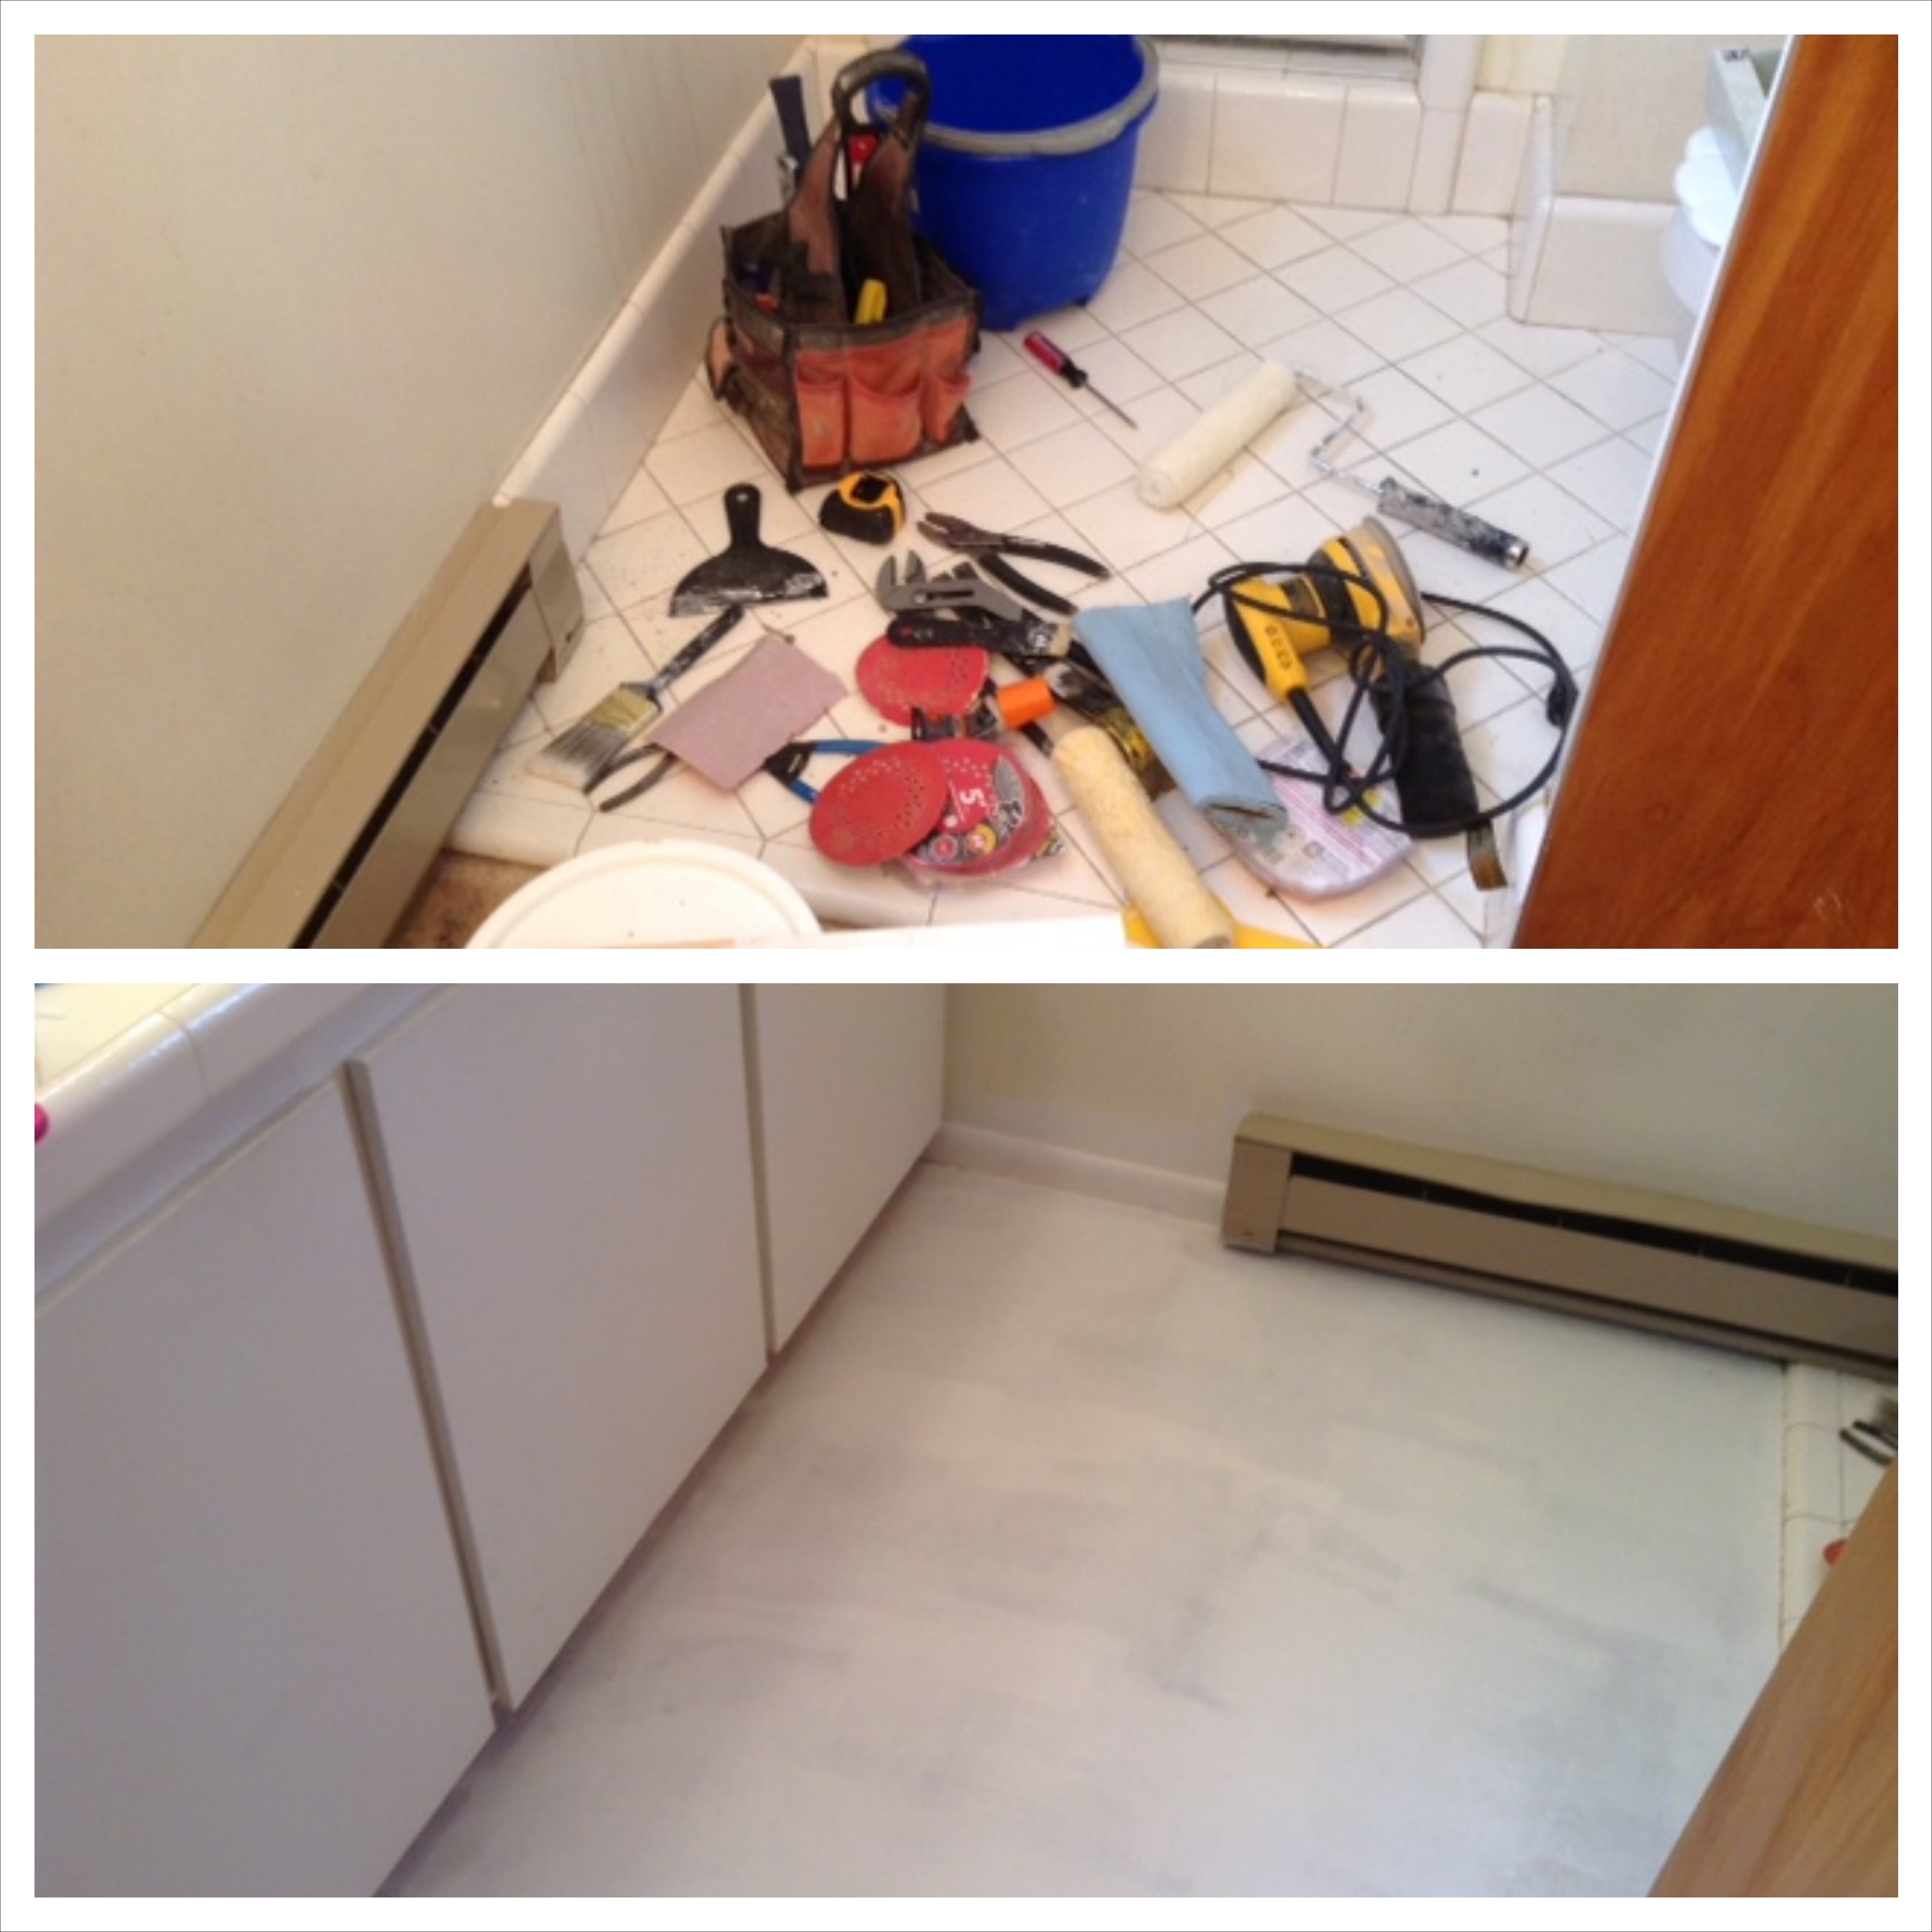
Oh, and that picture below? That’s what our bathroom looked like (strewn with tools and paint supplies) during the week that I tackled this project.

toolsandonecoatprimer

The floor looked so much better after just one coat of primer!

But for good measure (I wanted our bathroom floor to be waterproof and very durable, after all) I rolled on a second coat of Kilz 2. And then I coated the whole floor with two coats of Behr hi-gloss white.

secondcoatprimer

And then the fun part began! For the stenciling I chose a pretty silvery gray called Silver Screen from Home Depot’s Behr line of paint. I chose a hi-gloss sheen for the gray because I wanted the whole thing to harden to a nice durable washable enamel.

stenciling1

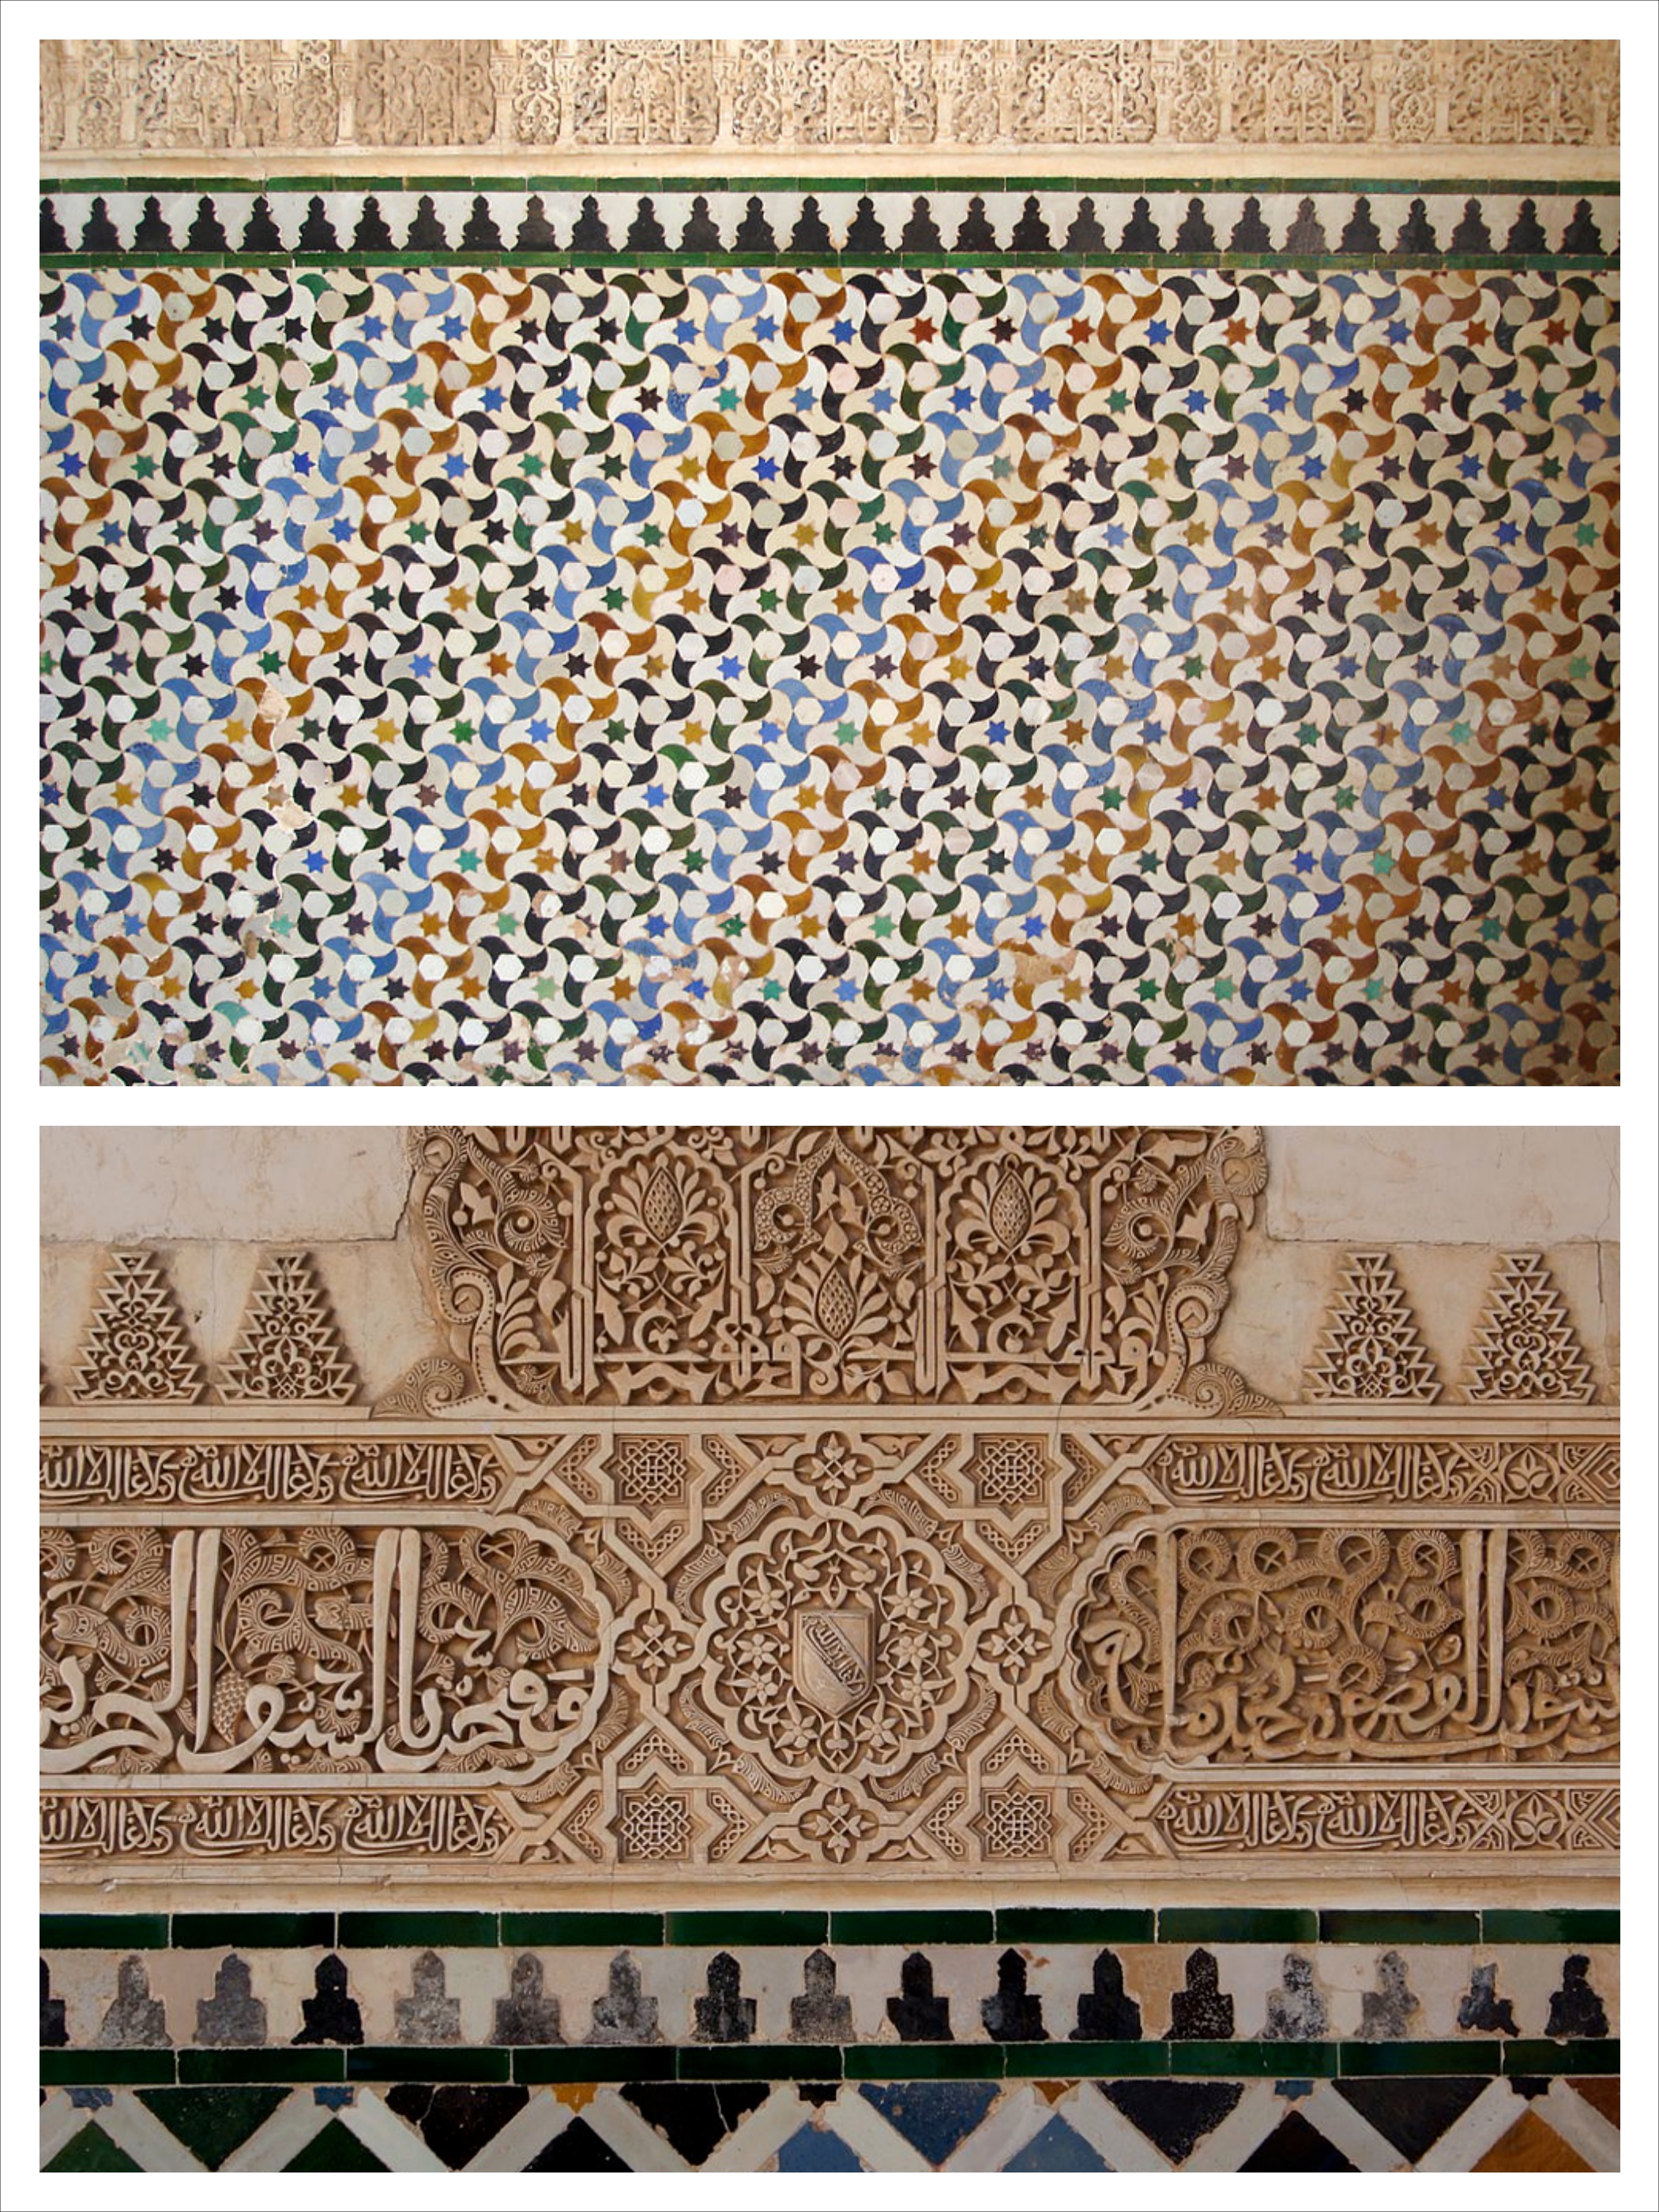
Isn’t it beautiful?! Mark and I both lived in Spain for a summer during college, and I am hopelessly in love with all things Spanish Arabic. I wanted a floor pattern that reminded me of the Alhambra, and I found this stencil at Hobby Lobby for $16.99! With my 40% off coupon, it was less than $11!

Alhambra floor tile inspiration. (Images from Wikimedia Commons. Digging up the Alhambra photos I took while I was in Granada would take at least thirty minutes of digging through old flash drives and I was busy painting a floor...ain't nobody got time for that!)

Alhambra floor tile inspiration. (Images from Wikimedia Commons. Digging up the Alhambra photos I took while I was in Granada would take at least thirty minutes of digging through old flash drives and I was busy painting a floor…ain’t nobody got time for that!)

The trick to getting the pattern even, I found, was to use a foam roller and a really, really thin layer of paint. I barely touched my roller to the paint and rolled it on my paint tray several times before rolling it onto the floor, and that gave the most even application. (I bought a quart of the Silver Screen paint, and the whole project used only about a third of that.)

Most wall and floor stencils, including this one, have little cut-out triangles that you can mark with pencil to know where to line up the stencil for the next section.

pencil,heater,door1

It got a little tricky around the edges, like around the heater and behind the door (see above). I was left with some blank spaces and weird corners (see below) where the stencil just couldn’t reach.

brushwork1

So I busted out my craft paintbrushes and painstakingly hand-painted the design into all the edges and corners where the stencil couldn’t reach. This was the most time-consuming part of the entire project; it took two subsequent afternoons.

edge1

You can see above how the stencil didn’t go all the way to the edge of the tile. I considered hand-painting the design in, but a) that would have taken another entire afternoon and b) I actually really liked the pretty scalloped design it made. So I left it the way it was.

Even though I had used Kilz 2 and hi-gloss paint (which hardens to a super-durable enamel), I still decided to coat the whole thing with a sealer. The hand-painting was really painstaking, after all, and I was determined that this floor would last a really long time, by darn.

I was just going to use some of the oil-based polyurethane we had left over from refinishing our hardwood floors, but thank goodness I did some internet research first and learned that oil-based poly dries to a yellowish amber color—not exactly the look I was going for on my white and silvery gray floor. So I bought a quart of water-based polyurethane, which dries completely clear, and sealed the whole painted floor with four coats. Crisis averted! Thank you, internet.

And so our bathroom floor was transformed from this…

before

To this!

finished3-1

It feels so much cleaner and nicer now; I’m not scared to walk on it with bare feet; and you can hardly see where the crack between the boards used to be. Most of all, the gorgeous Granada-inspired design makes me so happy every time I see it!

And, in case you were wondering, I completed this project five weeks ago (as I mentioned before, I’m doing catch-up posts) and it’s been holding up splendidly ever since then!